Showing posts with label Carol Dunham. Show all posts

Friday, June 24, 2016

BLOSSOM CANVAS tutorial by Carol

Hello again. Carol here once more...sneaking in a little extra tutorial for this month as I get next month off! Today I'll show how I produced this pretty framed canvas.


I started with a 5x7 canvas board which I'd painted with black gesso. Using the Weaving and Square Links stencils I added detail to the corners with texture paste.


Once dry I dry brushed some hint of mint acrylic paint over the board, adding a second coating over some parts.


Then it was time to add some more texture using various stamps from the Mixed Media Elements set using Archival ink.


Using the same stamp set I did some heat embossing with white detail EP and silver Metal Magic.


My sentiment came from the Blossom like a Butterfly set, stamped onto tissue paper and heat embossed with black detail EP then applied with medium gel.


To finish I stamped and heat embossed two butterflies onto card and fussy cut and after adding additional colour attached them with silicon gel. Using the Flutters and Splatters stencil I added some smaller butterflies with ink and Radiant Gel.


Love all the textures and dimension on this canvas...the frame was a cheap one from the local DIY store.


I hope you've enjoyed today's tutorial and hope you'll join me again next time.

Products used:
ARTplorations: Weaving, Square Links and Flutters and Splatters (large) stencils
STAMPlorations: Mixed Media Elements and Blossom like a Butterfly stamps

Others:
Gesso, Texture Paste, Acrylic Paint, Archival Ink, Embossing Powder, Metal Magic, Medium Gel, Radiant Gel.

Friday, June 3, 2016

ALTERED BOX tutorial by Carol

Hello everyone, Carol here today to show you how I upcycled this box. As we're busy getting ready to move home my younger son was clearing up his room and presented me with an empty box...well it was perfect for altering and instead of adding it to the ever growing "ripe to alter" pile I decided to do something with it straight away!


I loved the textured kraft card and started by painting with white gesso to get a wonderful shabby chic distressed look.


I then used texture paste and the gorgeous Merry Go Round stencil over the top of the box...I wasn't sure how this would work on the corrugated card but it came out wonderfully.


Once dry I inked it with DI in two colours


To finish I tied it up with string and added some buttons and wooden bits from my stash.


A very quick and simple transformation and I was very pleased with the result. I hope you enjoyed this little tutorial and I'll catch you again next time.

Products used:
ARTplorations: Merry Go Round stencil

Others:
Gesso
Texture Paste
Distress Ink
Decorations from my stash


Friday, May 6, 2016

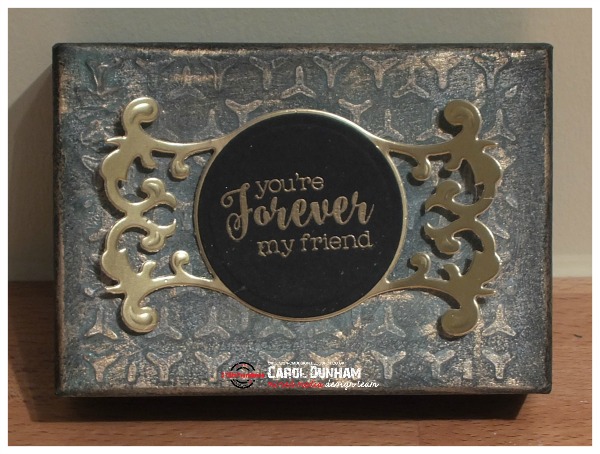
FOREVER MY FRIEND tutorial by Carol

Hello everyone, Carol here today showing how I upcycled an old box to make a pretty gift holder for a friend.

This is how the box started life.


A coat of black gesso got rid of the tell tale logo.


I then used transparent matt textured paste through the Lattice Y stencil.


Once dry, I dry brushed with some white gesso. At this point the project took a totally different turn to what I'd had in mind! (Nothing new there then!)


I got out my Mica Powders and dotted three colours all over with a brush.


Me and Mica Powders don't seem to work well together but I immediately sprayed with water and set the colours with my heat gun. I then highlighted with some gilding waxes.


My sentiment is from Fond Expressions 2, stamped with versamark and heat embossed with gold detail EP before being die cut and mounted onto a gold die cut.


A very quick and simple transformation, all ready to add a gift to for a friend who doesn't do fussy and fancy.


I hope you've enjoyed my tutorial today and I'll see you again next month.

Products used:
ARTplorations stencil: Lattice Y 
STAMPlorations stamp: Fond Expressions 2

Other Products:
Gesso
Transparent Matt Textured Paste
Mica Powders
Gilding Waxes
Spellbinders Dies

Friday, February 5, 2016

DISCOVER LIFE'S WONDERS tutorial by Carol


Hi there, Carol here today with a tutorial to show how I decorated this wooden block.

I started with an old stamp block which I'd previously painted with gesso.


Using the Gridlocked stencil and black lava texture gel I created the background.


I've used the gorgeous Morning Glory large stamp and stamped on some left over gelli print which features the Foiled Again stencil.


This was used to paper piece an image stamped onto green card. 


Once the texture gel had dried I used a mix of gelatos and Distress Sprays to colour the background....of course at this point I realised I should have varnished the block first as I then had to repaint the remaining surfaces!!


Some words from the Bold Sentiments: Discover set and a hot glue gun were all that were needed to finish off the project.


I hope you've been inspired by today's tutorial and I'll catch you again next month.

Products used:

ARTplorations: Gridlocked and Foiled Again stencils
STAMPlorations: Morning Glory large stamp and Bold Sentiments: Discover stamp set

Others: gesso, black lava texture gel, Distress Sprays and Gelatos

Friday, January 8, 2016

TEXTURE PASTES AND GELS tutorial by Carol

Hi there, Carol here today to share a tutorial about texture pastes and gels.

Like me you may be a novice to Mixed Media work and the vast array of products out there to use with your stencils. Hopefully reading this will enlighten you to a few of them!

Having a tidy up I discovered I had Texture Paste, Crackle Paste, Grunge Paste, Bead Glitter Gel, Sand Texture Gel, Black Lava Texture Gel, Texture Paste Transparent Matt and Multi Medium Gloss!! What to do with them all?

First I made myself a mood board using acrylic paints, my gelli plate and two of the new large stencils - Flutters and Splatters and Leaf Bliss.


This was cut into four pieces and using the Gridlocked stencil I added two mediums to each piece.


At this point I disappeared to make the tea and left them all to dry naturally....see you soon!


Texture Paste - this one has a lovely soft consistency and is great for getting a smooth coverage. It dried to a smooth finish.


Crackle Paste - again this had a soft consistency but was fluffier than the texture paste. It also covered well. I'm not good with "crackle" and at first glance I was a bit disappointed with this but as you can see the finished texture is quite different to the texture paste...more like the natural surface of a brick.


Grunge Paste - this is a much thicker, heavier paste and gave more density than any of the others. The finish was less smooth than texture paste due to the thicker consistency.


Bead Glitter Gel - this is very gluppy...sort of glue with little beads in. As you can see it dries clear with a lovely sparkle and texture.


Sand Texture Gel - a lovely soft gel with added sand. It dries to a clear textured finish....not awfully visible in the photo, sorry!


Black Lava Texture Gel - again a lovely soft gel with added black lava. It dries to leave a lovely textured finish and gave great coverage.


Texture Paste Transparent Matt - this is a very soft paste and gives good coverage. It dries clear and smooth. Great for resist work if you're looking for a matt finish.


Multi Medium Gloss - this is much runnier than any of the others and would be great for highlighting small areas as it dries to a lovely gloss finish.

I hope you've found this little tutorial helpful, have fun playing with your stencils and don't forget to join in our Mixed Media challenge over at STAMPlorations.

Products used ARTplorations: 

Others:
Gelli Plate
Acrylic Paint
Daler-Rowney Texture Paste
Golden Gel Mediums Crackle Paste
PaperArtsy Grunge Paste
Faber Castell Glass Bead Glitter Gel
Windsor & Newton Sand Texture Gel
Windsor & Newton Black Lava Texture Gel
Ranger Texture Paste Transparent Matt
Ranger Multi Medium Gloss

Friday, December 11, 2015

STRETCHING STENCILS tutorial by Carol


Hi there, Carol here today with a tutorial to show how you can extend those smaller stencils to cover a larger area seamlessly.

Let's begin....I started with a gorgeous pillow box from a well known retailer but wanted to cover up the logos so started with a coat of gesso.


I chose the Old Rose Prints stencil and embossing paste taking the stencilling down over the curved ends.


Allow the texture paste to dry...I prefer to let mine dry naturally or you can use your heat tool. Re-position the stencil so the middle rose is lined up over the half rose from the previous stencilling and apply texture paste through the right half of the stencil. Again allow to dry.

(You might find it helpful to mark the stencil so you know which way up it goes...guess how I know that one!)


Repeat until you've covered your project.


Now it's time to decorate: I chose to use the same colour paint as the original box and left the underside untouched. Sentiment die is from Fond Expressions 2.


I hope you've enjoyed today's tutorial and it helps you get more from your stencils.

PS Don't forget the Stencil Hop at STAMPlorations we'd love to see you linking up your projects.

Products used:
ARTplorations: Old Rose Prints stencil
STAMPlorations: Fond Expressions 2 stamps

Others:
Texture Paste
Dies from Spellbinders
Stickles
Flower Loom

Monday, November 23, 2015

TEXTURED TAG tutorial by Carol


Hi there, Carol here today with my tutorial for November. Today I'll show you how I used my stencil to add texture to this tag without the need for messy pastes....or the drying time!


I smooshed a tag with distress paints and allowed it to dry.


After taping my tag to the Weathered Wood stencil, I ran it through the Grand Caliber to emboss it, this shows the reverse of the tag so you can see the depth of texture.


I taped the tag and stencil to my craft mat then inked the tag with distress ink using the darkest of the green paints I'd used on the tag.


I then added some stamping using various stamps from the Mixed Media Elements set using Archival ink.


I added sentiments using the Vignette: Christmas Block set, then adhered my die cuts, ribbon and button to finish.


Items used:
ARTplorations: Weathered Wood stencil

Others:
Memory Box; Glowing Candles die

I hope you've enjoyed this month's tutorial and I'll see you again next month.

Search This Blog